Background

Dec 22, 2011

Basketful of Homemade Ornaments


At the Island Open House someone showed how to make glass ornaments for the holidays. It was such a cool idea I had to run to Michaels and pick up 2 dozen ornaments and my daughter and I proceeded to make them for family and friends.

You have to use glass ornaments and not the plastic variety. You mix water and liquid pearls to create the glue and spray inside (or outside) the ornament depending on the effect you want. You then sprinkle glitter inside the ornament. We did some with the Martha Stewart Glow in the Dark glitter and others with red, pink and purple glitter that we also had. (The few containers my daughter didn't get into a year ago when she covered the bathroom...).

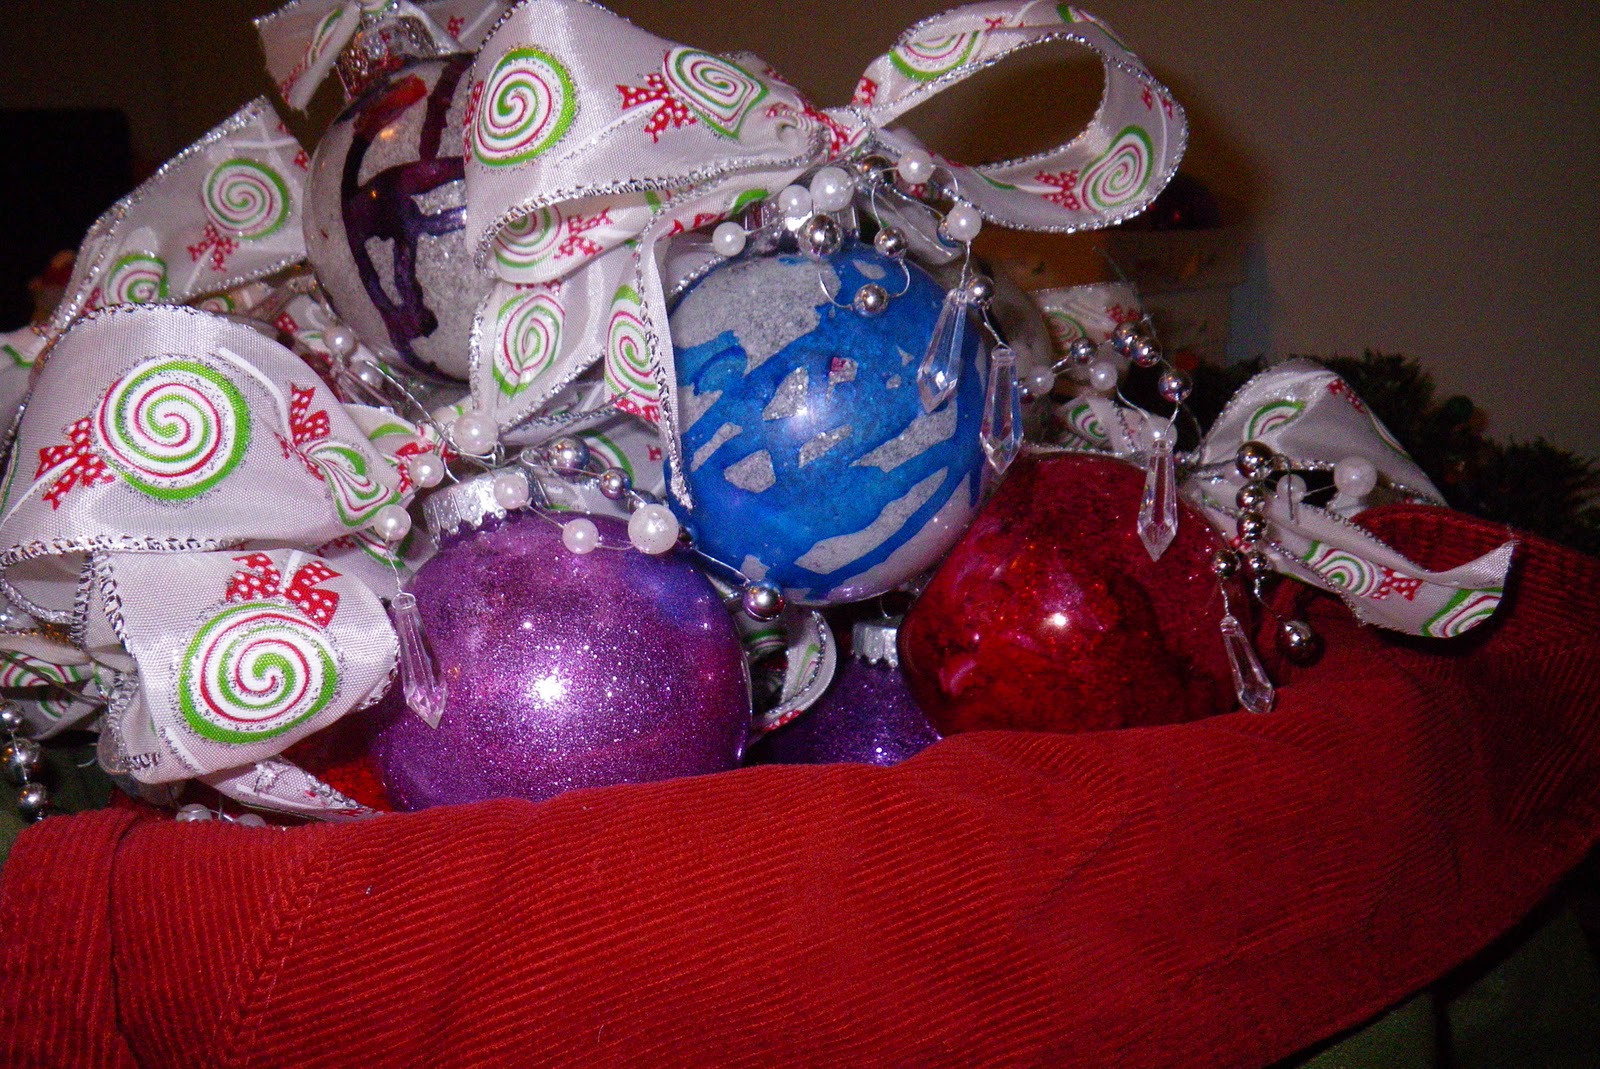
Some of the ornaments were then decorated with Ranger alcohol ink. This was the exciting part, holding the ornament up away from my daughter's body but still within reach and over the craft table cover so my table didn't get accessorized. She did have some very colorful hands when all was done but the Ranger scrubbie works on her hands as well.

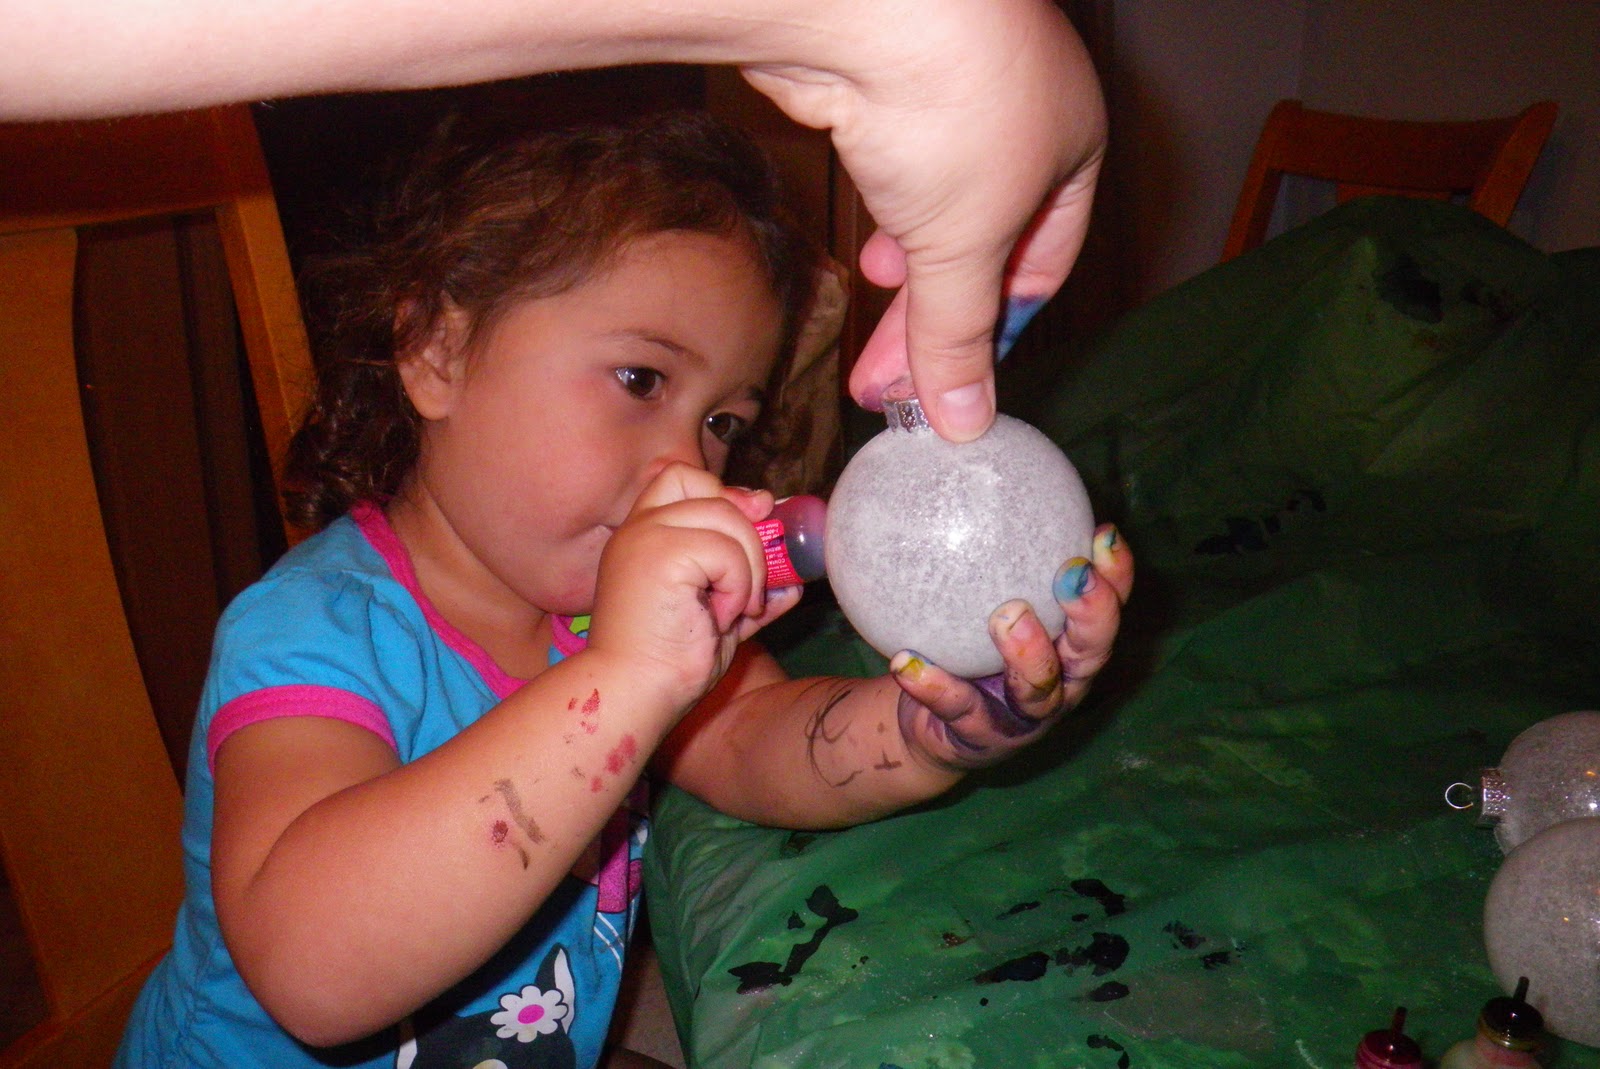
Here she is post clean-up showing off her handiwork.


We also decorated some of the ornaments with glitter on the outside and some got glitter on the inside but no alcohol ink. All were finished with some gorgeous Christmas bauble garland and a peppermint bow.

Dec 18, 2011

Tim's 12 Tags

I so enjoy Tim #12Tags. It is amazing to see what he can come up with each and every day. I have to admit I have been guilty of staying up until midnight to see what the new tag is and then I plot how I will make it in my sleep. Or rather lack of sleep. EEEE!

Today's technique featured crackle paint. I embossed the snowman from grungeboard, cut out by hand, and then applied the tattered rose crackle paint. I think I did a good job as I got some pretty big cracks. I then distressed again with the spun sugar distress ink and spun sugar and festive berries distress ink.

I coated a tag in distress ink picket fence and fired brick and then stamped fired brick snowflakes all over. I then used my finger tool and added some more picket fence to dilute the image. I knew that even though Tim had gone all blue for his tag that I wanted to go all pink and red. I pulled out some red, white, pink glitter snowflake paper to line down the side. I also used this same pattern paper to add to my charm at the top. I tied the charm on with red tulle and red garland ribbon. I then added glossy accents to the charm. I also had a red tag on hand that said Dec 25 which I applied to the bottom of the snowman. Just perfect!

Enjoy and merry christmas!

Dec 15, 2011

Delivering Christmas Joy

I hope you all liked my 12 Cards of Christmas Series. It was great fun to develop them and come up with a new theme for each day. And just think there will be more next year!

Delivering Christmas Joy


Today I am sharing a home decor project I did in November which I call "Delivering Christmas Joy". I found these 8 cute reindeer and sleigh at Michaels over the summer. Actually I was looking for reindeer and a sleigh about half the size these are to add to my Up on the Rooftop Advent Calendar. While I didn't get exactly what I was looking for I am very happy with the final product.

The reindeer are painted in a brown metallic paint. Each have a garland halter around their necks and and connected to the sleigh. All of the reindeer have baubles on their antlers - one of my friends called them earrings - but I think the baubles helps to upclass them a bit. In fact this is the first project that I have added baubles. I've always been nervous before about jump rings but a quick 5 minute tutorial and I am a jump ring demon - and I have enough sets of pliers to prove it! The 4 reindeer in the back are the younger more anxious reindeer ready to get a move on. While the 4 reindeer in the front are older and wiser and know to rest while Santa is delivering presents to the good little girls and boys. Today Santa Mickey is driving the sleigh but tomorrow it could be our Elf Scout or maybe an Annalee doll.

Enjoy! I know my fellow croppers did while I was making these as they kept walking off into other people's crop bags...

BTW don't you just love the new shelves my husband built and installed...finally

Dec 14, 2011

12 Cards of Christmas Series - # 12 Home for the Holidays Card

I hope you enjoyed yesterday's card. I am a little sentimental today as this is the last card for 2011. But I think I ended with a good one.

I found this paper on clearance at Scrapbook Island and knew it would be perfect paired up with a digi stamp from La La Land Crafts. The ornament pattern paper was distressed with the festive berries distress ink. I then used my copic markers to color in Marci, as you can see I went with festive colors, including coloring in the panda bear with green colors rather than black and white. I added red and green buttons with red and white twine from the Twinery.

Enjoy and merry christmas. I will be back with more goodies throughout the month!

Dec 13, 2011

12 Cards of Christmas Series - # 11 Warm Wishes Card

Warm Wishes
I hope you enjoyed yesterday's card. We are almost near the end!

Today I am sharing a card I created called "Warm Wishes". This is meant to be my Christmas neutral card for my non-Christmas celebrators. It is a blue cardstock base card to which I added a purple cardstock belly band. Here I added three felt snowflakes of different colors - teal, dark blue and white. I added a gem to the dark blue felt snowflake. Finely I added a "warm wishes" sentiment that I cut from my Cricut, it includes a smiley face on the a.

Enjoy and merry christmas!

Dec 12, 2011

12 Cards of Christmas Series - # 10 Tweet Wishes Card

Tweet Wishes
I hope you enjoyed yesterday's card.

I have a new card to share today called "Tweet Wishes". This card was a lot of fun to make. I paired a bird on wire pattern paper with a blue and dark blue checkered pattern paper. The bird on wire paper include falling snowflakes and a hint of green. The patterned paper also came with matching tags. I combined 3 matching tags with a Wishes token from Tim Holtz, a purple brad and some snowflakes from the Martha Stewart deep edge punch. I stamped in the sentiment Tweet Wishes.

Enjoy and merry christmas!

Dec 11, 2011

12 Cards of Christmas Series - # 9 Gingerbread Family Card

Gingerbread Family
I hope you enjoyed yesterday's card.

Today I am sharing the Gingerbread Family Card. I saw this delightful paper at Scrapbook Island and just had to make some cards from it. On the reverse side of the gingerbread was this cute striped paper in orange and red which I used as my card base.

At the top of the card I added 3 additional layers from the same pattern paper after adhering I added on either side a Mr and Mrs Gingerbread brads. Next up was my Gingerbread family. I used two sections of this paper for a layer effect.


After adding the first gingerbread layer. I hand cut out the gingerbread family, applied rock candy stickles to all the white frosting and added red pearl pen to all the belly buttons. It was such a fun card to work on and you get to enjoy dessert without the sugar rush or calories.

Enjoy and merry christmas!

Dec 10, 2011

12 Cards of Christmas Series - # 8 Tree of Snowflakes Card

Tree of Snowflakes
I hope you enjoyed yesterday's card.

Today I am sharing a Tree of Snowflakes card. I love the green and red plaid pattern paper as the background for this card. It gives a sense of home and family. I wanted to make a simple card to go with this simple paper. I cut some triangles of different sizes from green cardstock. I left a hinge at the bottom of each triangle so I could give a raised but shadow effect on the card. And I embellished them using the Tim Holtz snowflake embossing folder.

After embossing I added red stickles to the embossed snowflakes. Yes, red stickles for red snowflakes, not white or blue. I was trying maintain the theme of the red and green plaid pattern paper. After the stickles had time to dry I added them to the card. I applied adhesive to the first layer and 3D foam dots to the second layer for the raised effect I was seeking.

Enjoy and merry christmas!

Dec 9, 2011

12 Cards of Christmas Series - # 7 Starry Night Reindeer Card

Starry Night Reindeer Card
Hope you enjoyed yesterday's brown present card.

Today I am sharing a Starry Night Reindeer Card. This card was a lot of fun to make and a lot of friends and family will be receiving this one. It is based off a sketch from Mojo Monday. The patterned paper is from Two Peas and the Indie Cards are also from Two Peas.

The card starts with a blue base. I added a twig patterned paper and from there the layering began. The reindeer were cut from the Tim Holtz reindeer die - which I seem to be using a LOT this season. Then I added a layer of brown paper and reindeer patterned paper. Then layered on the reindeer and sentiment Indie Card. The sentiment features Santa and his 8 reindeer flying over rooftops saying Merry Christmas to all and to all a good night.

The reindeer were cut on kraft paper and then misted with 2 different Tattered Angels mist and then Tim Holtz distress ink. A blue and white twine were knotted around there neck for extra texture. The finishing touch was smearing the distress stain white picket fence on the ears and tails.

This card is a hybrid in that it uses both traditional scrapbook supplies and also digital scrapbook supplies. I'm not sure it saves as much money as it feels like it should. But the digital paper allows you to size to the exact size you want.

Enjoy and merry christmas.

Dec 8, 2011

Tim's 12 Tags

Inspired by Tim Holtz 12 Tags of Christmas day 3 here is my version of the tag. The Christmas Sentiments stamp set from Stampers Anonymous went from being on my wish list to my must have list when I saw his tag. Fortunately Simon Says Stamp was able to ship it out right away and it arrived today.

I used the festive berries distress ink for the sentiments and then I pulled out my Two Peas Christmas Indie Cards again for the yuletide image. I distressed the yuletide image and the tag in the evergreen bough distress ink and then added some cute baubles from Michaels and red and green stripped ribbon. I love how this came out.

I also tried to produce using the kraft paper but I just don't like it at all. You lose all the rich red color. That is probably why Tim Holtz used the distress re-inkers instead of the ink pads. Many of my friends and family can expect to see this tag very soon!

12 Cards of Christmas Series - # 6 Presents Under the Tree

Presents Under the Tree
Hope you enjoyed yesterday's Poinsettia card. Today I am sharing a brown based card of presents hiding under the tree ready to surprise the little ones on Christmas morning.

This quilted Christmas tree is just delightful and I paired it with the corresponding brown pattern paper from the collection. I stitched brown and white twine around the first layer and added presents under the tree with 3D foam dots.


I added the rocking horse specifically for my Aunt Tammy. 

Enjoy and merry christmas!

Dec 7, 2011

12 Cards of Christmas Series - # 5 Poinsettia

3D Poinsettia Card
Hope you enjoyed yesterday's card!

Today I am sharing a red and gold poinsettia card with the sentiment "Peace on Earth". I selected a golden polka dot pattern paper to place on the green grid base. A poinsettia pattern paper was added and additional poinsettias were applied with foam dots to create a layered affect.  A red glitter ribbon was applied and then the sentiment "Peace on Earth".

It is a very traditional elegant card compared to the "Little Girl Believe" and "Cascading Ornaments" cards I have shared previously. But there are more pink and non-traditional card colors to come!

Enjoy and merry christmas!

Dec 6, 2011

12 Cards of Christmas Series - # 4 Cascading Ornaments

Cascading Ornaments
Did you enjoy yesterday's card - "Little Girl Believe"?

Today I created a "Cascading Ornament" card to share with you all. The swirling pink background fits the idea of the ornaments quickly gliding past us as the most wonderful time of the year flies past us.

I cut out 3 ornaments from an ornament pattern paper. I then distressed each ornament and added pearl pen and distress stickles to each card. I found a pretty pink bow ribbon at Scrapbook Island that assisted with the ornaments cascading by and the sentiment "Merry Christmas" as added in brick red ink.


Enjoy and merry christmas. Until tomorrow!

Dec 5, 2011

12 Cards of Christmas Series - # 3 Little Girl Believe


Did you enjoy yesterday's card?

Today I made an ultra pink/aqua card for a little girl to give to a BFF or girl cousin. The caption is BELIEVE which all little girls do.  The stamp is a Marcia stamp from La La Land Crafts - love. I combined with a hot pink base card, pink/blue/green elves pattern paper. So cute!! I find this ultra cute pink feather ribbon at Scrapbook Island and just had to buy a couple yards - just in case. Jewels in the coordinating colors round out this ultra kid card. 

Can't wait to see who Amelia's gives this card too. 

Enjoy and merry christmas!

Dec 4, 2011

12 Cards of Christmas Series - # 2 Musical Joy

I hope you enjoyed the Peppermint Flower Christmas card yesterday.

Today I am sharing a card I call "Musical Joy". The base is red cardstock, to which I added some Christmas music paper. The music paper is printed in red rather than traditional black and I spritzed it with Tattered Angels Glimmer Mist spray. It's a good thing there were words on the paper as I didn't have to guess which way was up.

A beautiful red satin banner was added  and the word JOY was cut out on my Cricut utilizing red, green and white striped glitter paper. A chipboard holly image rounds out the ribbon nicely.

Enjoy!

Dec 3, 2011

Musical Reindeer Tag 12/3/11

It took me much longer to make this second tag then expected. But Christmas activities have started in a frenzy. Do you realize there are only two more weekends to Christmas! Last night we selected our tree and went to ZooLights at the Oakland Zoo. Today we had the Scrapbook Island open house!

I choose to use my music note stamp instead of the kraft resist paper. I still applied the white picket fence distress stain and quickly white off, such a nice look. I really like the canvas/grungeboard reindeer and of course had canvas on hand after the quirky turkeys at Thanksgiving. I used a Martha edge punch and red jungle bells for the bottom trim. Finally I swapped out the burlap for the red tulle. Enjoy!! 

12 Cards of Christmas Series - # 1 Peppermint Flower

And here is my inaugural 12 cards of Christmas!


For my first Christmas card I chose a peppermint theme.

This beautiful candy paper features gumdrops, candy canes and lollipops. I found some fun tissue paper at Michaels in a peppermint theme and another set featuring holiday phrases. I then made a tissue paper flower taking time to ink and mist each of the 9 layers, following a tutorial from 7Gypsies. The ink used is the winter seasonal berries ink from T!m Holtz. Instead of applying simple brad or jewel I combined the layers with a candy cane. Multiple layers of peppermints layer under the tissue paper flower as well. The sentiment is "Have A Sweet Holiday".


May you have a wonderful holiday season!

Dec 2, 2011

Inaugral 12 Cards of Christmas Series

I love Christmas - even more than Halloween - and I always go card crazy this time of year. Now with my blog I am able to create even more Christmas card options and share them with you. Stay tuned because starting tomorrow I will be sharing a new card each day for 12 days.

Now to set the record straight I already have all 12 of these cards done and some of my family and friends may receive hard copies in the mail before the posts go live. But there is just no way I could do a fresh card each day and get it posted. Not with my little angel helping me :)

I hope you all enjoy!

Dec 1, 2011

Snowman Tag 12/1/11

I just couldn't help/stop myself. I got home from work and Amelia was still out at Super Franks with Daddy. So I dived into all my supplies and started playing. It is clear the I did not follow T!m's tag exactly, I decided to play up the snow angle which means I can leave this out well past Christmas this year.

The card was embossed with the snowflake die that had been colored with faded jeans distress ink first. I then added the embossing powder and heat dried, I LOVE the glittery effect. Thank you so much Tim!

Next up I pre-inked the snowman die with iced spruce and tumbled glass. Post embossing I decided it needed more color and did more iced spruce, tumbled glass and faded jeans.

Some snowflake tissue tape, snowflake charms, Caribbean blue twine from the Twinery, and so hot glued gems rounded out my creation. I just love how the snowflakes dangle freely in front of the snowman.

Can't wait for tomorrow's creation from Tim!!

Up on the Rooftop Advent Calendar


Up to the Rooftop Advent Calendar


This year I chose to create my own Advent Calendar. The final product came out much better than I had envisioned although different from my initial design. I purchased the base product from Artist's Club Advent Calendar. From there I painted the roof black, painted the house two different reds including the T!m Holtz fired brick red distress ink, and the ground white, the numbers tiles were painted yellow and yellow glitter.

Embellishing the calendar was the best part! White flocking to represent snow on both the rooftop and ground. I got a lighted necklace to add lights to the rooftop and added icicle garland as well. Next up was the teddy bear and presents on the rooftop. The presents are sliding down the rooftop after being delivered by Santa and his helpers. And finally gingerbread men were added to the base to assist with turning the numbers. The numbers were cut using my Sizzix and a T!m Holtz die cut and then made into stickers.


Because Amelia is a toddler and there is no room to hid presents in this calendar I placed simple Disney Princess stickers on the reverse side of the tile. After she turns each number I will pull a present from the magic bag for her to enjoy.